Functions and Rules: The Cornerstones of Automations

Functions and Rules are the core parts of automations in Lumeer. With their use, you and your whole team can save a significant amount of time. You will be able to get rid of many update emails and meetings.
Automations can do a lot of work for you like sending a regular report, remind you of your tasks, move a process to another state, notify a colleague etc.
Functions and Rules in Lumeer are made extremely easy to set. They are configured in a visual way that is natural to humans so that every Function and Rule are easily understood. Functions and Rules in Lumeer share the same concepts and there are only a few general principles that are good to know.
Where Functions and Rules Can Be Used?
As we might know, there are five types of automation tools:
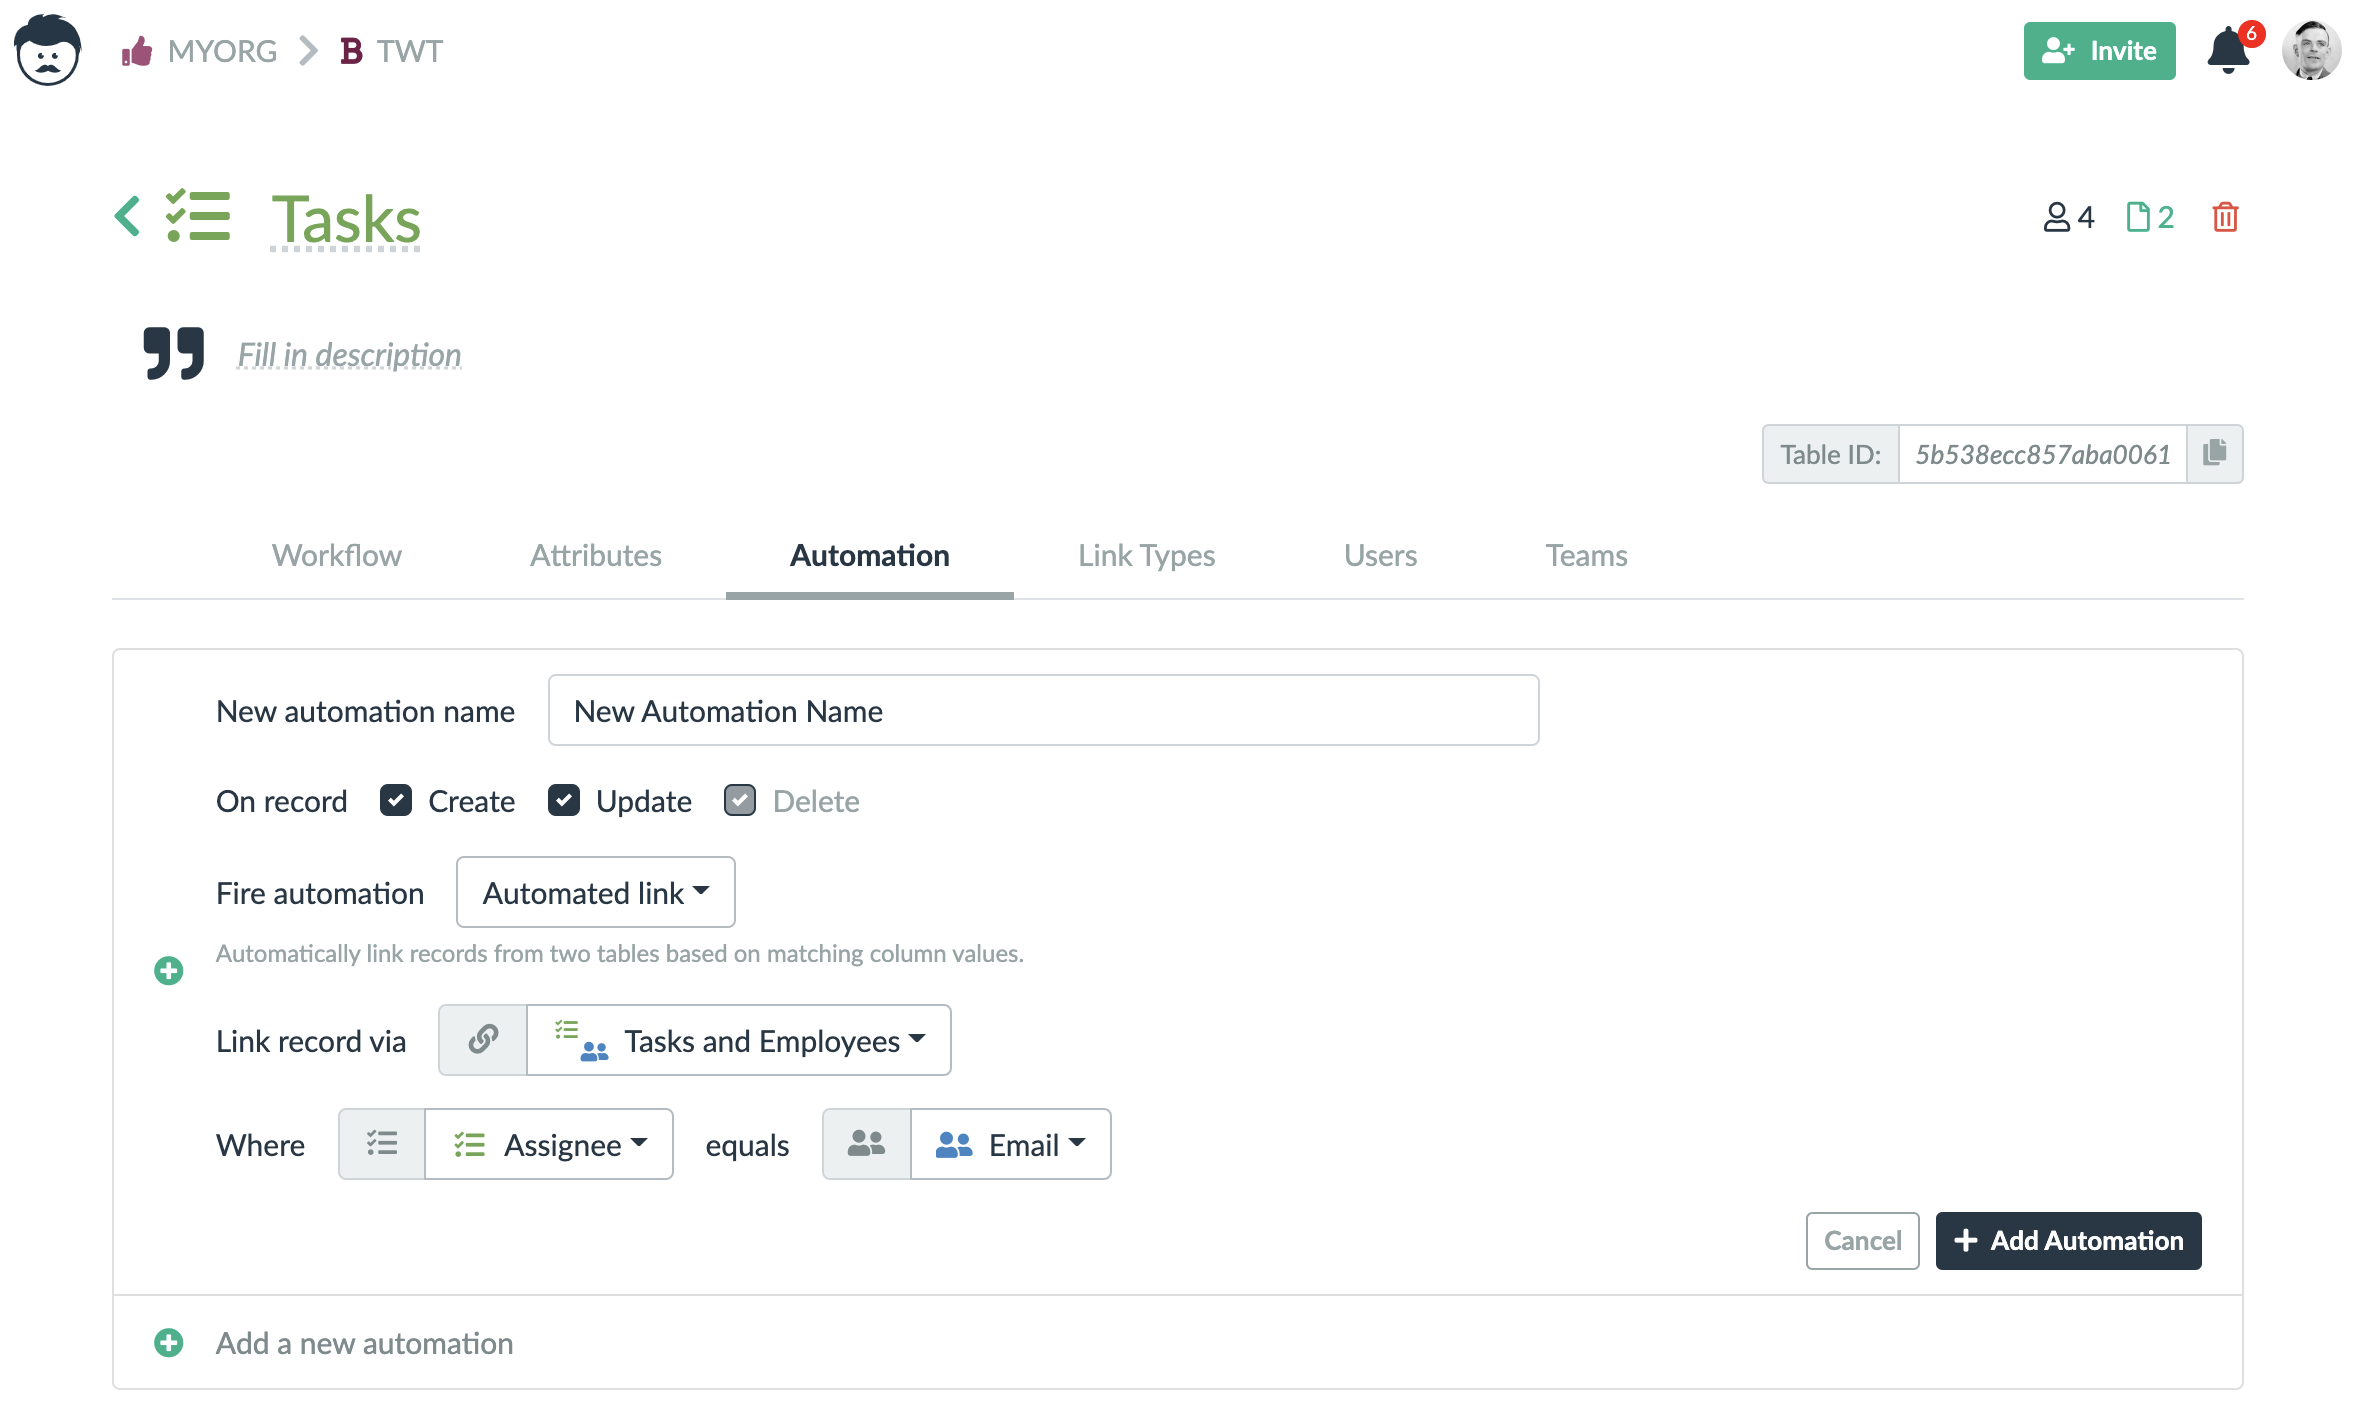
- Links that are automatically created between tables based on matching values of records.
- Functions that compute values in a column in both tables and links,
- Rules that perform actions based on certain events (creation, update, deletion) of records in a table, or of a link between two records.
- Actions that are similar to Rules but are executed when a user clicks on an action button.
- Timers that are again similar to Rules but are executed based on predefined timing conditions.
Let’s have a look on where these automations are configured.
1. Links
Automated links are the easiest of the automations. They actually do not need any blocks mentioned below. You can access them in a table settings. All you need to do is to specify:
- The link type you want to be used for automated links creation,
- and the two matching columns from the linked table.
A new link is always automatically created between records (table rows) when there is the same value in the matching columns in both tables.
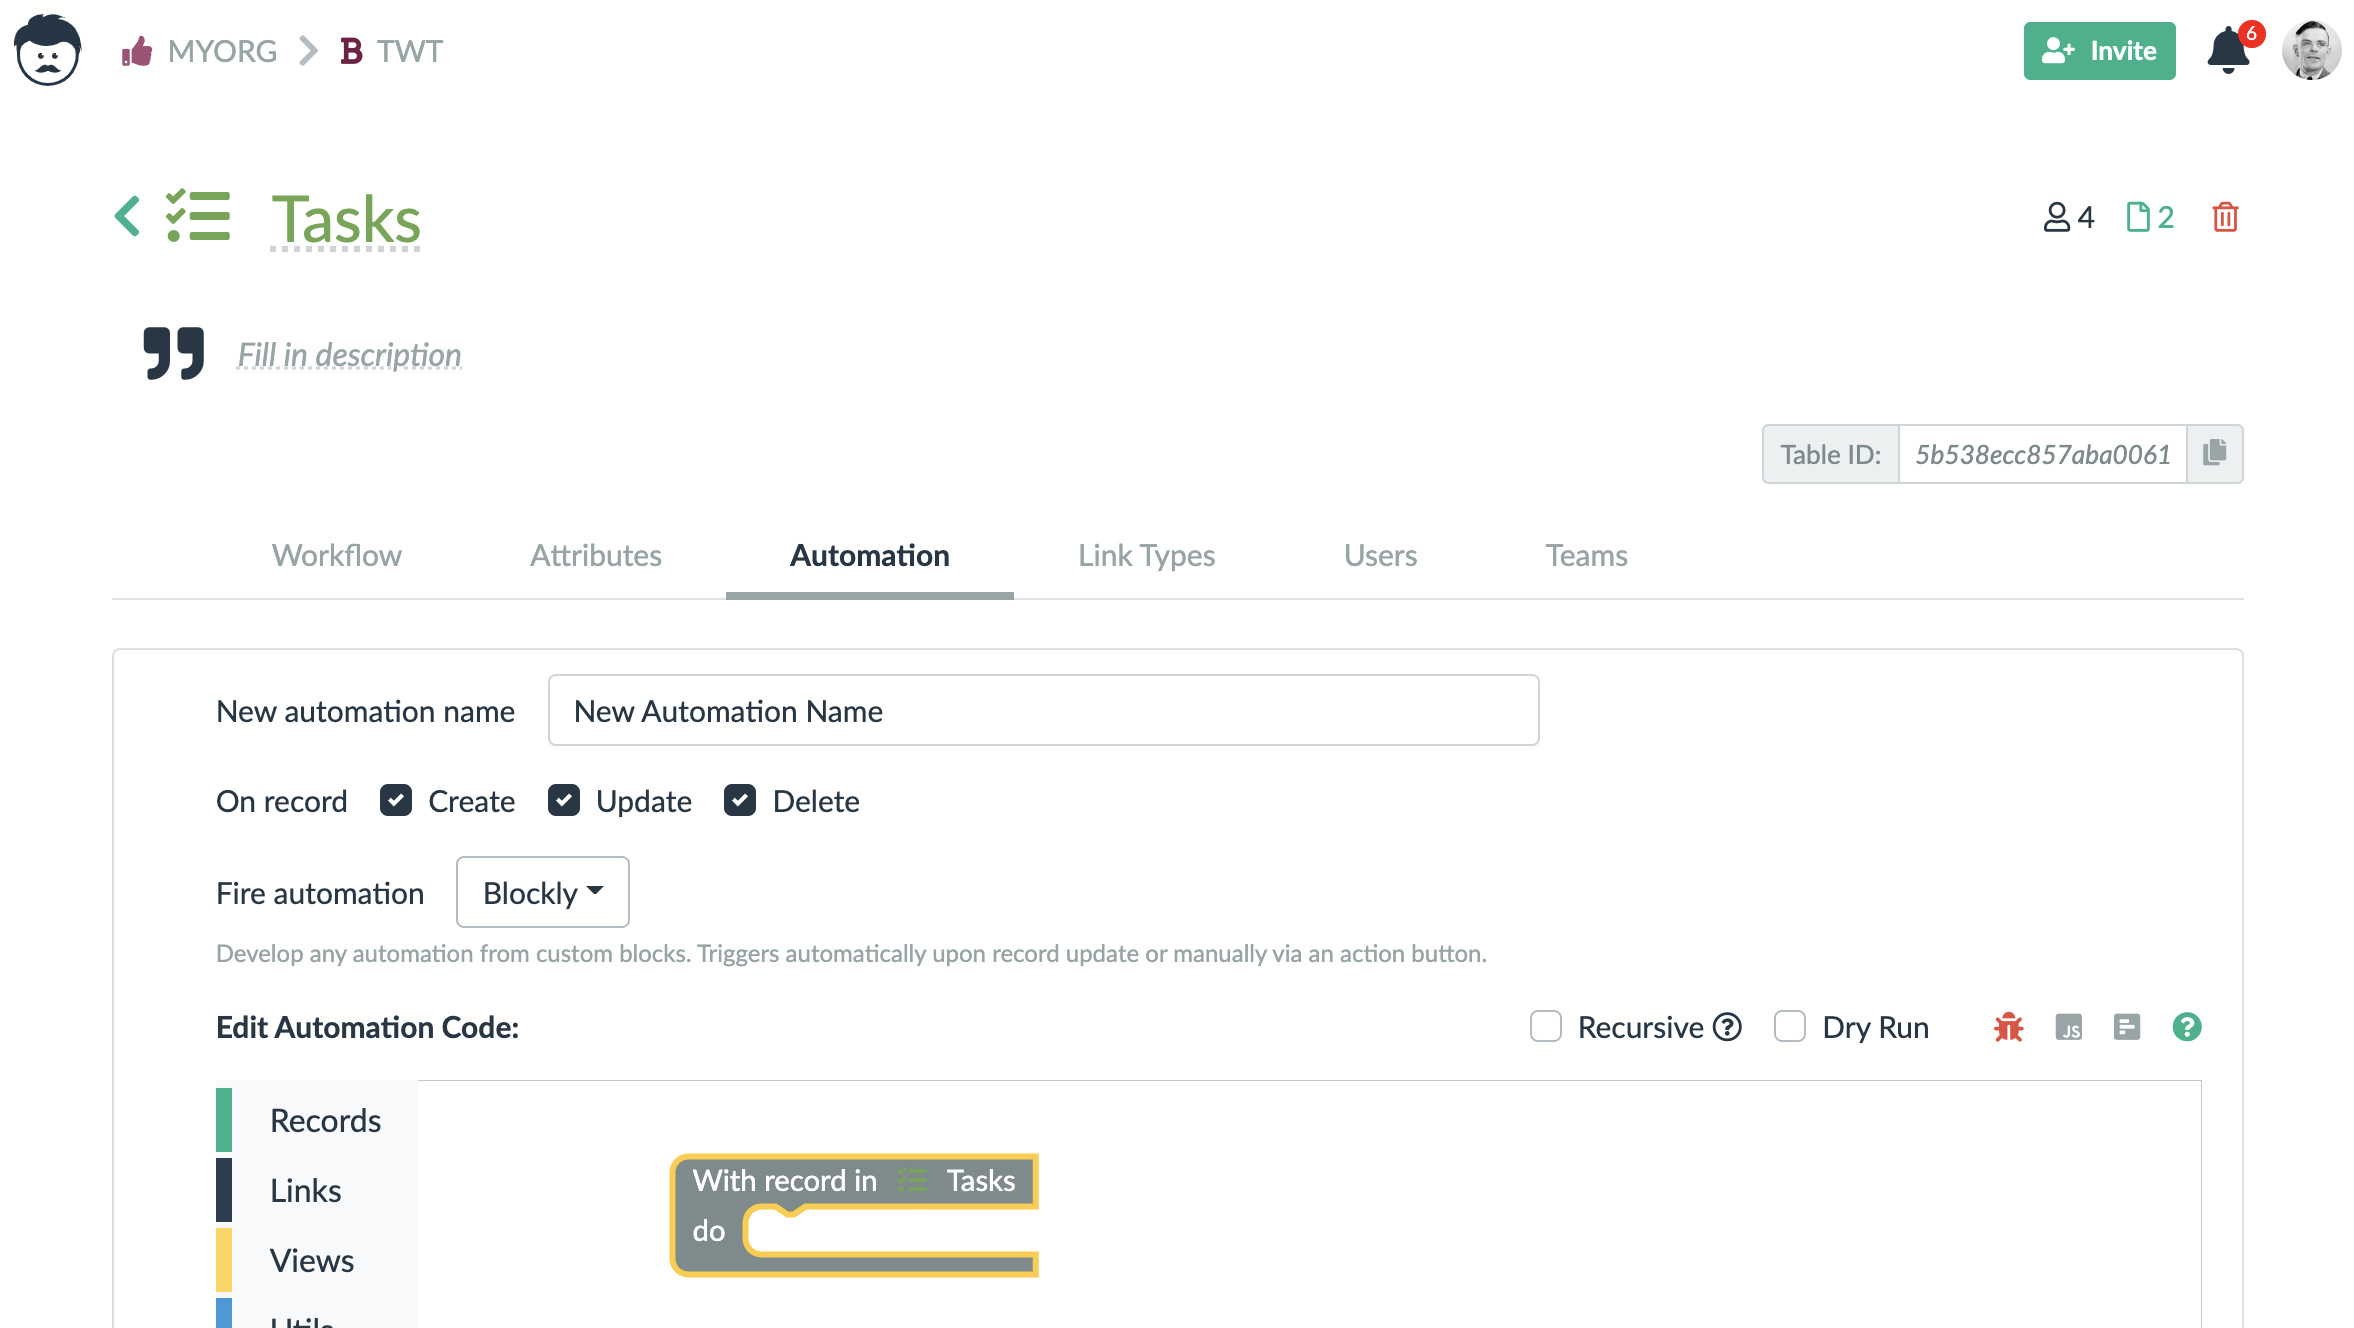
2. Functions
Functions can be used to calculate values of records in tables, or in links (links can have values as well). These are typically configured in a table header. Although, there are couple of more places where you can configured functions like the detail view, the detail dialog, or the detail panel.
The functions use the blocks that are described below. Within the functions, you have access the current record (row) and all its attributes (columns). You can also use links to get values from linked records.
One important thing to note is that functions are only calculated when some of the values they depend on changes. You might be tempted to calculate relative values like number of days from today. However, such values won’t be updated when the date changes.
Instead of functions, you can use a Timer for such a case.
The result of a function needs to be a value that is automatically assigned to the specific attribute (column) of the record. The set of blocks in the functions are therefore limited to those that are capable of returning values.
If you need more complex calculations with cycles for example, we recommend you to use the rules.
The same function is always applied to the whole column to prevent any errors of incomplete ranges.
3. Rules
Rules are similar to the functions and they can be also used in tables as well as in links. The rules always work with whole records and they react to some events. These events are record or link creation, update, and deletion.
Within the rules you have access to a previous and the current state of a record.
When a rule is triggered by creating a record, the previous state is empty. On the other hand, when a rule is triggered by deleting a record, the current state is empty.
The rules are always executed after the change is already made. It is not possible to forbid or block a change using a rule. It is however possible to revert the record values to their original state.
For the rules, a full set of blocks is available. However, blocks that are not connected to the outer encapsulating block (labeled With record/link in …), are not executed. Such blocks can actually cause the rule to fail completely.

A change made by a rule does not trigger other rules unless the checkbox Recursive is checked. But you cannot keep executing the rules indefinitely.
Lumeer always calculates which automations need to be executed based on the event that happened. Then it executes all the automations in a sequence. Based on the Recursive parameter, Lumeer can evaluate the changes once more, calculate a new set of automations and execute them once more.
At this point in time, no other automations are executed to prevent endless loops.
4. Actions
Actions are basically the same as the rules. A rule can be used both as a rule triggered by a record change, and also by an action button.
Simply put, actions are rules that might not any trigger events set. They can fully rely on being executed by a button.
For actions, the same conditions regarding the Recursive parameter apply as for the rules.
5. Timers
Timers are also the same as the rules. They are just executed on a predefined timing conditions.
The main difference is that a timer need to pull in the records it needs to work with. This is because the timers are not triggered as a results of a data change.
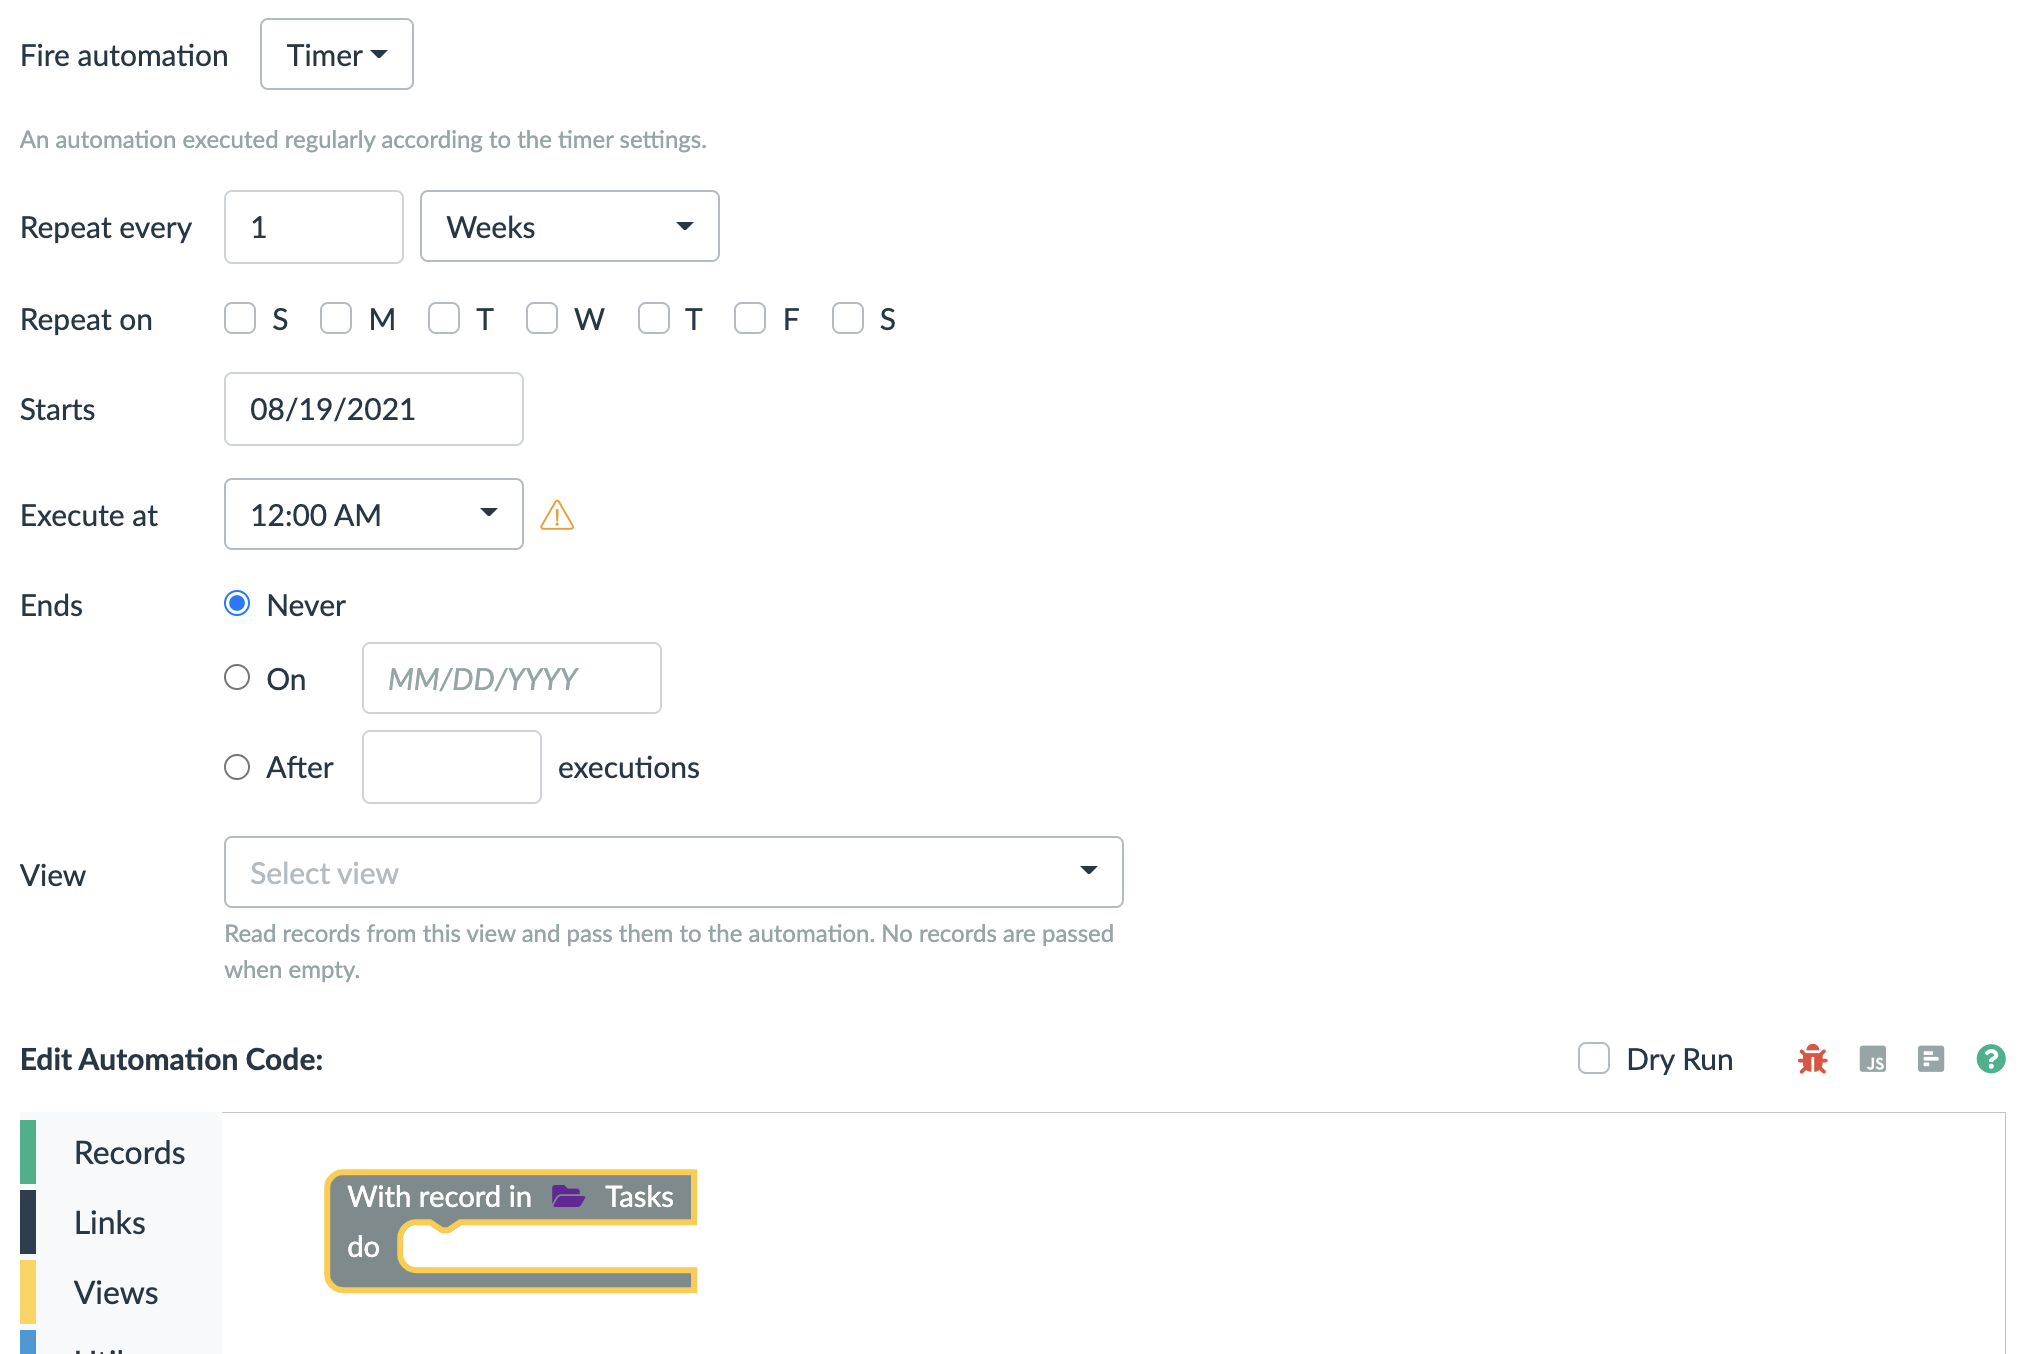
You can either specify a view that is used to get you all the data, or you can use a corresponding block to read the records.
It is highly recommended to always created a view with very fine grained and narrow filters. This ensures that only the necessary records are passed to the timer.
This is important for two reasons – memory consumption and execution time. All the functions and rules, including actions and timers have a limited execution time of 3 seconds, and they can read at most 1000 documents.
If these limitations were critical to you, please get in touch with us.
Advanced Debugging
For technical users and administrators, there are a few debugging tools available in the functions and rules.

From left to right, you can see a checkbox to turn on a Dry Run. This way, the rule is executed as normally, but no data operations are written. You can then access the dry run results using the second icon from the right.
Next is an icon that shows you the last exception recorded during the rule execution. Please notice the time it has been reported to make sure you really see a recent exception.
Following is an icon that shows you the source code of the rule. The blocks are internally translated to JavaScript and the source code might give advanced technical users a hint about what goes wrong.
You can also calculate the rows in the source code to get an approximate place where the exception is being thrown.
The Puzzle: How to Build a Rule?
Now, let’s dive deep in how the rule blocks work.
Following is an example of quite a complex Rule. As you can see, it is sort of a puzzle.
Every single piece of the puzzle is called a Block. Blocks can have ears (on the left side), arrows (at the bottom), round holes (on the right side) and triangle shaped holes (at the top). As in an ordinary puzzle, there are no ears or holes at the edge of the whole Rule or Function and the outer edge is all smooth.
The Flow of Information
Creating custom Rules and Functions is easier when we understand the flow of information between Blocks.
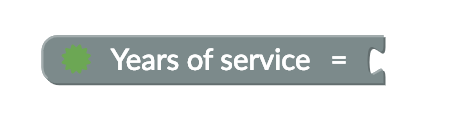
Values (i.e. content of cells in the Table perspective) are always collected on a single line of Blocks from right to left. The following Block produces a value on its lefts side (hence the ear on the left side) and must be connected to a Block with a whole on its right side (i.e. a Block that accepts some input).
As mentioned, a hole on the right side of a Block expects a value to be connected. In the following example, you can see a Block that expects a value on its right side (a list of values, to be precise), it transforms the values (in this particular example, it computes the sum of the values) and provides them on its output on the left side.

There are no blocks with a bottom arrow and an upper triangular hole in Functions. Thus the next section applies only to Rules.
Commands
This section applies only to Rules.
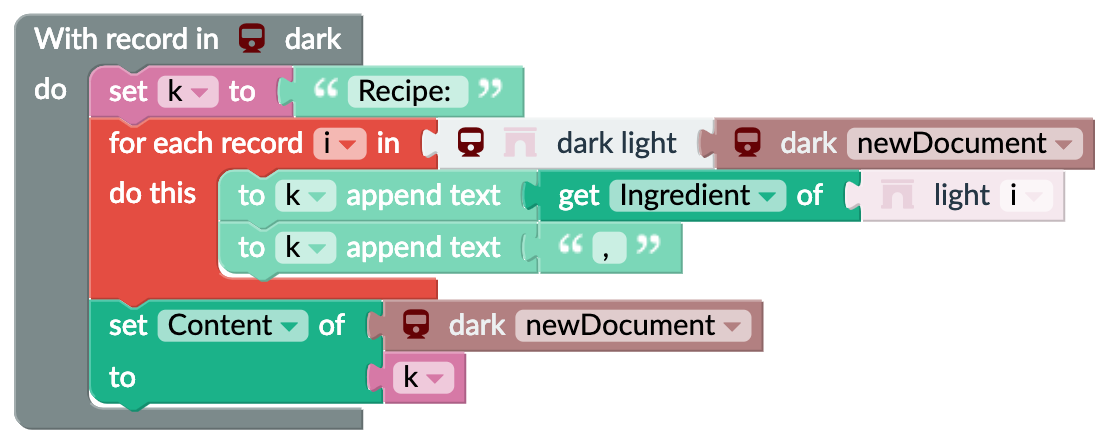
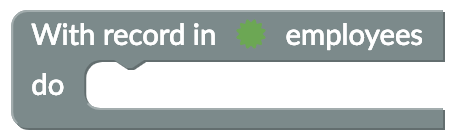
There is a second type of flow, it is a time flow or time sequence and it flows from top to bottom. Individual lines of Blocks form commands that are executed in a sequence from top to bottom. This can be seen in Figure 1. The flow is as follows:
- The pink Block set k to is executed. This Block sets a variable k to the value of the Block connected on its right side. In this case k is set to a text “Recipe: “. More on variables can be found in a later section.
- Then the red block for each record i in is executed. This block takes an input value (a list of records) and executes its inner commands for each record in the list. The following sequence of commands is then executed repeatedly:
- Append Value of the Ingredient attribute to the variable k.
- Append the text “, “ to the variable k.
- Now there is a list of ingredients from all the Records in the light Table linked to the master Record from the dark Table in the variable k. The next Block set Content of accepts two inputs. First the document that it works with, and second the value to set to the document’s attribute (value of the k variable) selected in the dropdown box (i.e. Content).
Variables
This section applies only to Rules as there are no variables in Functions.
There are commands that can set and read variables. You can imagine a variable as a side note or a post-it next to your computer where you note down some value. Every post-it represents a single variable and it has a title, or a name if you will, to differentiate individual post-its among each other. These variables simplify the overall Rule configuration so that we don’t need to repeat a set of Blocks every time we need to access a value. Changing the variable does not change the original record.
The Wrap
No matter whether it is a Function or a Rule, there is always an encapsulating block. The first example shows an encapsulating Block for a Rules and the second one is for Functions.
Anything you add to the canvas needs to be connected to or wrapped within the encapsulating block in the end. Blocks scattered on the canvas are ignored and can cause a Function or Rule not to work properly.
Accessing Data
Terms
In order to easily understand how work with your user data, we need to establish a common terminology. If you are not already familiar with terms like Table, Record, Attribute, Value, please refer to the chapter Accessing Data in Basic Principles Guide.
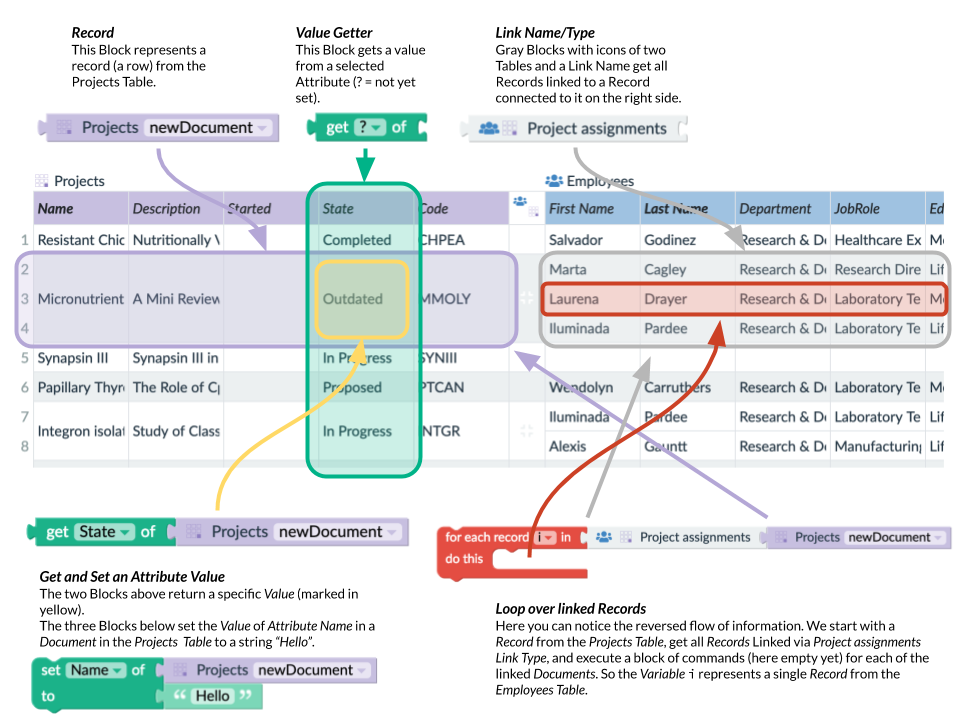
Record Blocks
The best way to start your Rule or Function is with a Block that represents current Record also referred to as Document. In Rules, there are two such Blocks. One with the label newDocument, and another with the label oldDocument. These two Blocks represent the state of the Document before and after an update so that both Values are available and we can compare whether a specific Attribute has changed. If case of Functions, there is just thisDocument.
In case of Rules reacting to the Document creation, the oldDocument is empty. In case of a Rule reacting to the Document deletion, the newDocument is empty.

Such a block represents a whole Document. The Document is present on its output which is the ear on the left side. To read a Value of a specific Attribute, we need a Getter Block.

Now, we have a single Value of the State Attribute on the left ear of the green Getter Block. Let’s see how we could obtain linked Documents. For that purpose we can reconnect our Document Block to a Link Block.

There is now an important difference. On the ear on the left side of the gray Link Block, there is a list of Documents. That is because a single Document can always be linked to multiple Documents. Also notice how the flow of information goes from right to left. It is actually the opposite way than how information are represented in the connected tables.
Pro tip: Why is that? If we changed the direction of information flow in Blocks, we would need to flip the encapsulating blocks. That way, they would look very unnatural. Also, the equation in Functions would be exactly the opposite as in mathematics (e.g. f(y)=x instead of y=f(x)).
Loops
The fact that there are multiple Documents influences subsequent Block. Let’s connect the Getter Block.

Because the Getter Block started with a list of Document on its input, it also returns a list of Values of the selected Attribute (“Last Name”) on its left side. We can now use various other Blocks to concatenate the strings, compute the sum of a list etc.
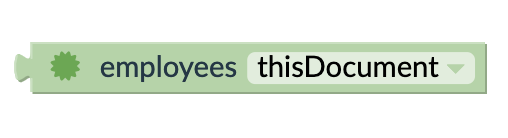
There is one drawback though. If we use the same approach to obtain several lists of Values, we can never figure out what Values in these two lists are originally from a single Document. For this purpose, it is useful to use a Loop Block and iterate over the Documents. Inside of the loop, we can access all Attributes of every single Document in the list, one after another.

The situation can be seen in Figure 9. The Rule starts by setting a Variable crossProduct to zero. Then it iterates over all Documents connected to the current Document in the employees Table via “employees positions” Link. The Blocks inside of the loop Block (for each…) are executed for each of the linked Documents. Inside of the loop, the Blocks add (change) the multiplication of Attributes Salary and Conversion to the crossProduct Variable. The Variable i represents a single Document inside of the loop. So when we read two different Attributes of this Variable, they always belong to the same Document.
The last Figure (Figure 10) is a cheat sheet illustrating how data are represented by Blocks.